
When you need to quickly process hard materials, knowing how to properly attach Roloc diamond discs can save valuable production time. Traditional abrasive mounting methods require the use wrenches and significant downtime. In contrast, the Roloc mounting system allows you to change discs of different grits in just a few seconds.
Therefore, mastering this Roloc quick change disc technology can improve your daily machining efficiency. This guide will explain exactly how to install these tools safely and effectively.
What is a Roloc Diamond Disc
Roloc diamond grinding discs are high-efficiency cutting and grinding tools designed specifically for hard materials. Manufacturers use advanced electroplating processes to bond diamond particles to the surface of the discs.
How the Roloc Quick-Change System Works
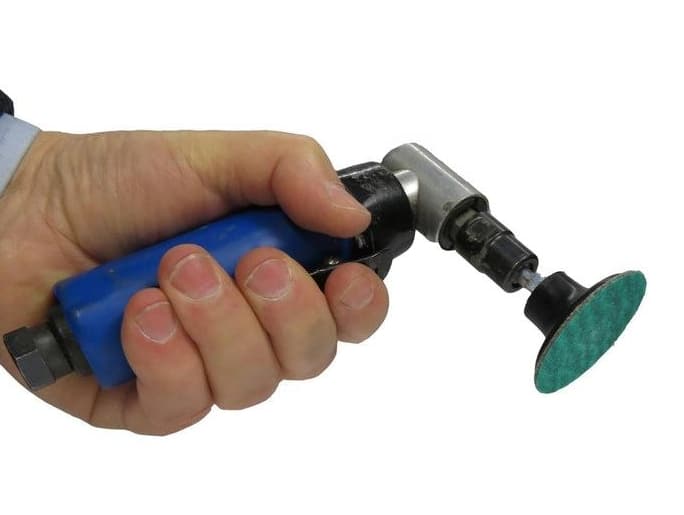
The system uses a simple male / female threaded connection. The disc features a threaded plastic button on its back. This button locks into a matching receptacle on a rubber backup pad. You simply use a straightforward “screw on, twist off” locking mechanism. As a result, this method is much faster than traditional backing systems.
Typical Applications
You can use these powerful tools for heavy-duty material removal. Typical applications include stone edge grinding and composite shaping. Additionally, they excel at removing welds and coatings. Contractors also rely on them for pre-treatment of tile and concrete surfaces, as well as deburring and detail grinding of carbide.
What Do You Need Before Attaching a Roloc Diamond Disc
To safely install Roloc diamond discs, you must have 3 essential components on hand.
Roloc Diamond Disc
First, select the correct quick change diamond grinding disc for your material. Choose a coarse grit for rapid material removal and a fine grit for surface smoothing.
Roloc Backing Pad (Holder)
You must use a compatible rubber backing pad. Industry professionals typically refer to this as a Roloc holder, Roloc mandrel, or Roloc backing pad. It provides support for the abrasive during the grinding process.
Compatible Air Die Grinder or Drill
Finally, ensure your power tool accepts the metal shank of the backing pad. The tool must operate within the maximum RPM rating of the disc.
How to Attach a Roloc Diamond Disc (Step-by-Step)
This is the core process for installing a Roloc diamond grinding disc. Please follow the steps below to ensure safety and optimal performance.
Step 1: Inspect the Disc and Backing Pad
First, inspect the plastic threads on both the disc and the pad. Use a brush to remove any dust or debris. Clean connections ensure a secure fit and lock.
Step 2: Align the Threaded Hub
Next, hold your tool steady. Center the threaded plastic hub of the Roloc disc attachment directly over the center hole on the backing pad.
Step 3: Twist Clockwise Until Locked
Press the sanding disc firmly down onto the rubber tray. Then, twist the disc clockwise for roughly one-half turn. You’ll clearly feel it “click” into place.
Step 4: Check for Secure Attachment
After rotating to lock it in place, gently tug on the outer edge of the sanding disc. The disc should not wobble, tilt, or come loose from the mounting base.
Step 5: Test at Low Speed Before Grinding
Finally, start your tool at low speed from a safe location away from the workpiece. This allows you to verify that it is properly balanced before you begin heavy-duty grinding.
Which Tools are Compatible with Roloc Diamond Discs
You must match the abrasive with the correct power tool to achieve optimal results.
Air Die Grinders
These remain the most popular choice in professional workshops. They provide the high and stable rotational speed required for effective diamond grinding.
Right-Angle Die Grinders
These tools feature excellent ergonomic design. As a result, you can easily maneuver the grinding disc into tight corners and complex profiles.
Electric Die Grinders
For on-site applications where compressed air is completely unavailable, you can use electric models. They offer excellent portability for on-site repairs.
Can You Use a Roloc Disc on an Angle Grinder?
Yes, but you cannot mount them directly onto the spindle. You must first install a special collet adapter on the angle grinder. Then, insert the 1/4-inch mandrel of the Roloc pad into that collet adapter.
How to Remove and Replace a Roloc Diamond Disc
When your grinding disc eventually wears out, removal takes only a few seconds. First, let the tool come to a complete stop and disconnect the power source. Second, firmly grasp the outer edge of the grinding disc. Then, rotate the disc forcefully counterclockwise. This decisive action will break the thread lock. Finally, spin the disc completely off the pad. Now, you are ready to attach Roloc diamond disc replacements and continue working immediately.
Conclusion
Understanding exactly how to attach Roloc diamond disc components ensures a safer and more efficient work environment. By keeping the support tray clean and strictly following the twist-lock procedure, you can eliminate unnecessary tool downtime.
If you need high-quality industrial abrasives with a service life far exceeding that of traditional sandpaper, our electroplated tools offer the ultimate solution. Contact our sales team today for a quote and to learn more about our high-performance abrasives. Our technical experts can help you select the exact specifications to maximize your factory’s production efficiency.
Frequently Asked Questions
Do I need a Roloc backing pad?
Yes. You absolutely need a specific Roloc backing pad to use these grinding discs. The pad features an internal threaded receptacle that physically locks the disc in place during high-speed rotation.
Can I mount Roloc grinding discs directly onto a grinder?
No. The grinding disc itself has only a small plastic locking tab. You must insert the metal mandrel from the support tray into the collet of the die grinder to operate the disc.
How do I know if the grinding disc is installed correctly?
When you twist the grinding disc clockwise, you’ll feel a firm point of resistance (i.e., the locking point). It should lie completely flat against the rubber backing plate. Additionally, when you spin the tool in the air to test it, it should not vibrate or wobble violently.
Post time: Sep-30-2026